How to Install WordPress Using cPanel
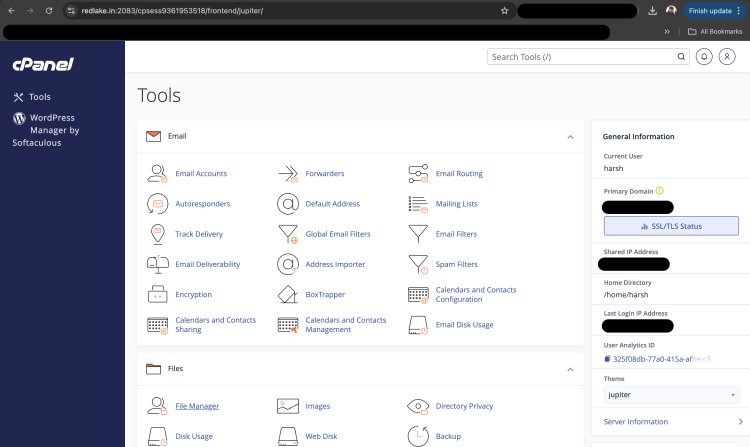
Are you ready to start your own website or blog? WordPress is one of the most popular content management systems out there, powering over 43% of all websites on the internet. In this comprehensive guide, we'll walk you through the process of installing WordPress on your cPanel account, step by step.
Why Choose WordPress?
Before we dive into the installation process, let's talk about why WordPress is such a great choice for your website:
-
It's user-friendly and easy to learn
-
Tons of customization options with themes and plugins
-
Great for SEO (Search Engine Optimization)
-
Regular updates and strong security features
-
Huge community support and resources
Now that we've covered the basics, let's get started with the installation process!
Prerequisites
Before you begin, make sure you have:
-
A web hosting account with cPanel access
-
Your cPanel login credentials
-
A domain name (or subdomain) where you want to install WordPress
Method 1: Installing WordPress using Softaculous
Softaculous is an auto-installer tool that comes pre-installed on many cPanel accounts. It's the easiest way to install WordPress, so we'll start with this method.
Step 1: Log into your cPanel account
Open your web browser and enter your cPanel login URL. It usually looks like this: https://yourdomain.com:2083. Enter your username and password to log in.

Step 2: Find Softaculous
Once you're in cPanel, look for the "Softaculous Apps Installer" icon. It's usually under the "Software" section. Click on it to open Softaculous.

Step 3: Select WordPress
In Softaculous, you'll see a list of available scripts. Look for WordPress and click on it.
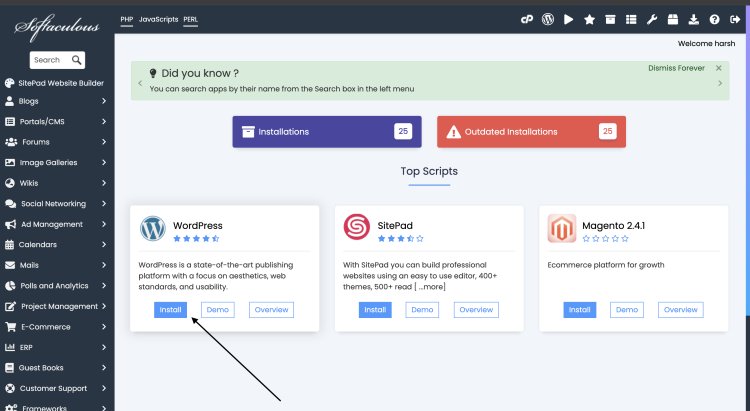
Step 4: Start the installation
Click on the "Install Now" button to begin the WordPress installation process.
Step 5: Configure your installation
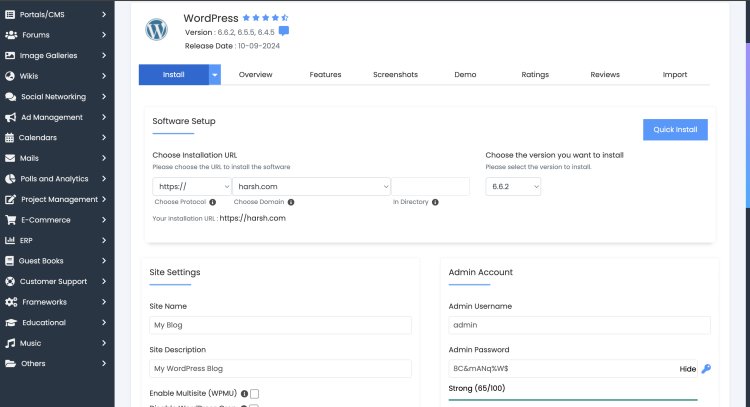
You'll need to fill out some information:
-
Choose the domain where you want to install WordPress
-
Leave the directory field blank if you want to install WordPress in the root directory
-
Choose an admin username and password (make it strong!)
-
Enter your email address
-
Select your preferred language
-
Choose a site name and description (you can change these later)
Step 6: Advanced options (optional)
If you scroll down, you'll see some advanced options. For beginners, it's best to leave these as they are. However, you can customize them if you know what you're doing.
Step 7: Select theme (optional)
Softaculous gives you the option to choose a theme during installation. You can select one now or skip this step and choose a theme later.
Step 8: Install WordPress
Once you've filled out all the necessary information, click on the "Install" button at the bottom of the page. Softaculous will now install WordPress for you.
Step 9: Installation complete
After a few moments, you'll see a success message. Congratulations! You've just installed WordPress using Softaculous.
Method 2: Manual Installation using cPanel File Manager
If you prefer more control over the installation process or if Softaculous isn't available on your cPanel account, you can install WordPress manually. Here's how:
Step 1: Download WordPress
Go to WordPress.org and download the latest version of WordPress.
Step 2: Extract the WordPress files
Once the download is complete, extract the WordPress zip file on your computer.
Step 3: Log into cPanel
Access your cPanel account as described in Method 1.
Step 4: Open File Manager
In cPanel, look for the "File Manager" icon and click on it.

Step 5: Navigate to your website's root directory
Usually, this is the "public_html" folder. If you want to install WordPress in a subdirectory, create a new folder and navigate into it.
Step 6: Upload WordPress files
Click on the "Upload" button in File Manager. Select all the files from the extracted WordPress folder on your computer and upload them to your server.
Step 7: Create a MySQL database
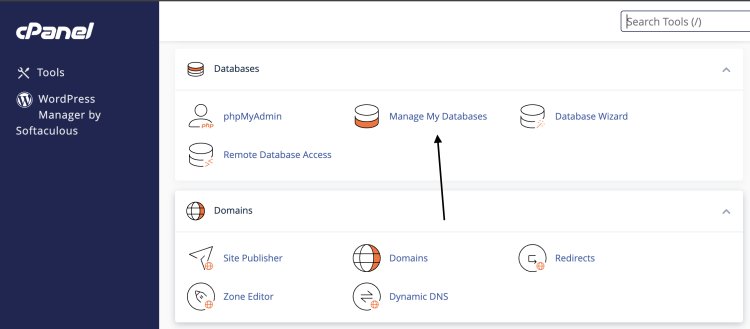
Go back to the cPanel main page and look for the "MySQL Databases" icon. Click on it and follow these steps:
-
Create a new database (remember the name you give it)
-
Create a new database user
-
Add the user to the database with all privileges
Step 8: Run the WordPress installer
In your web browser, go to your domain name. You should see the WordPress installation page. If not, try yourdomain.com/wp-admin/install.php.
Step 9: Enter database information
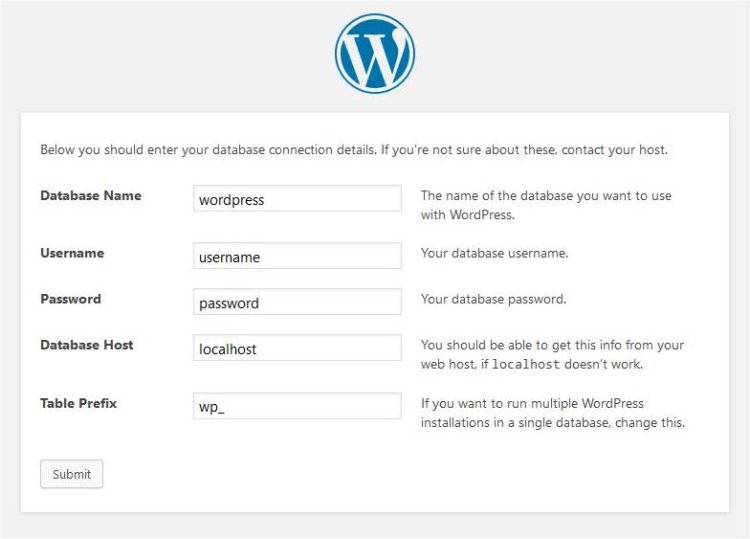
On the WordPress installation page, click "Let's go!" and enter the following information:
-
Database name (the one you created in Step 7)
-
Database username
-
Database password
-
Database host (usually "localhost")
-
Table prefix (leave as default unless you have a reason to change it)
Step 10: Run the installation
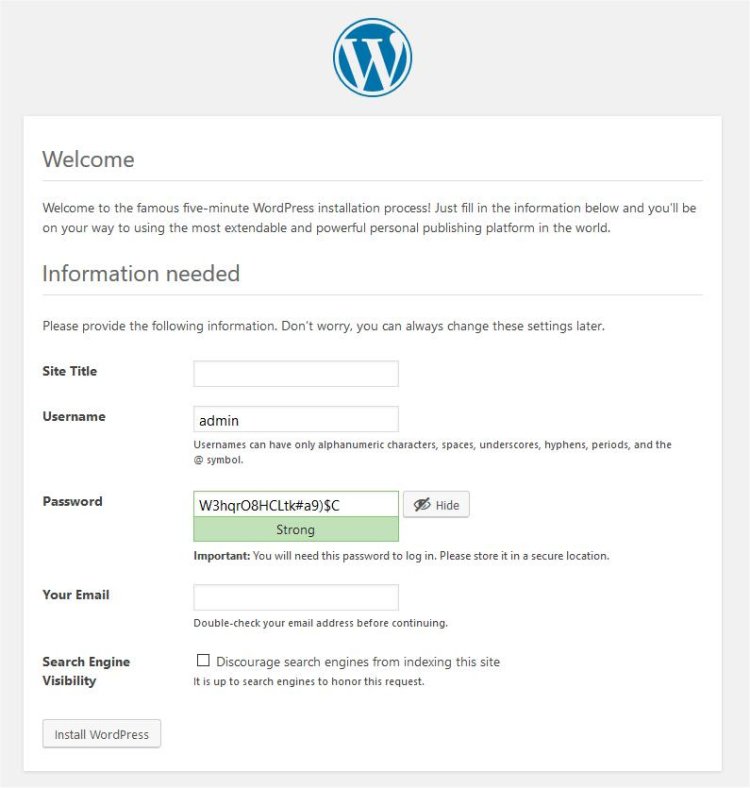
Click "Submit" and then "Run the installation." On the next page, enter your site information:
-
Site title
-
Admin username
-
Admin password (make it strong!)
-
Your email address
Step 11: Finish the installation
Click "Install WordPress" and wait for the process to complete. Once it's done, you can log in to your new WordPress site!
Common WordPress Installation Errors and How to Fix Them
Even with these step-by-step instructions, you might encounter some issues. Here are some common WordPress installation errors and their solutions:
1. Database Connection Error
This error occurs when WordPress can't connect to your database. To fix it:
-
Double-check your database name, username, and password
-
Make sure you've entered the correct database host
-
Check if your database user has the necessary permissions
2. White Screen of Death
If you see a blank white screen after installation, it could be due to a PHP memory limit issue. Try these fixes:
-
Increase PHP memory limit in your wp-config.php file
-
Deactivate all plugins and switch to a default theme
-
Check for syntax errors in your theme or plugin files
3. Internal Server Error
This generic error can have multiple causes. Try these solutions:
-
Check your .htaccess file for errors
-
Increase PHP memory limit
-
Deactivate all plugins and reactivate them one by one
4. Error Establishing Database Connection
Similar to the database connection error, this can be fixed by:
-
Verifying your database credentials in wp-config.php
-
Checking if your database server is running
-
Contacting your host if the problem persists
5. Stuck in Maintenance Mode
If your site is stuck showing a "Briefly unavailable for scheduled maintenance" message, try:
-
Deleting the .maintenance file in your WordPress root directory
-
If the file doesn't exist, check your wp-content folder for partially updated plugins or themes
6. Upload: Failed to Write File to Disk
This error occurs when WordPress doesn't have permission to write files to your server. To fix it:
-
Check and adjust file permissions (usually 755 for directories and 644 for files)
-
Contact your hosting provider for assistance with permissions
WordPress Maintenance Best Practices
To keep your WordPress site running smoothly, follow these maintenance best practices:
1. Regular Backups
Always back up your site before making any major changes. Use a backup plugin or your hosting provider's backup service.
2. Security Measures
Install a security plugin like Wordfence or Sucuri to protect your site from threats. Use strong passwords and enable two-factor authentication.
3. Monitor Site Performance
Use tools like Google PageSpeed Insights or GTmetrix to regularly check your site's performance and make necessary improvements.
4. Clean Up Your Database
Over time, your database can accumulate unnecessary data. Use a plugin like WP-Optimize to clean it up periodically.
5. Check for Broken Links
Broken links can harm your SEO and user experience. Use a plugin like Broken Link Checker to find and fix them.
Conclusion
Installing WordPress on your cPanel account is just the beginning of your website journey. With its user-friendly interface and endless customization options, WordPress offers a world of possibilities for creating and managing your online presence.
Remember, the key to a successful WordPress site is ongoing maintenance and optimization. Keep your site updated, secure, and well-optimized, and you'll be well on your way to achieving your online goals.
Whether you're starting a blog, building an e-commerce site, or creating a portfolio, WordPress provides the tools and flexibility you need to bring your vision to life. So go ahead, start exploring, and happy WordPressing!




Comments (0)